|
Note: the following is only an example. You need to replace all
the sample information with your own information if you want this to work on your own computer!
Please make sure that you have gone through all the steps in How to run a WEBcam site before you continue here!
That will ensure that DynamIP will store the capture files
locally before the uploader will put them on the remote server using FTP..
To run a remote WEBcam site you need the following information:
 | The name of IP address of the FTP server for uploading your files. For
this example I will assume that the name of the FTP server is ftp.geocities.com. |
 | Your user name (or login id) for the FTP server. For this example I
will use hellu. |
 | Your password for the FTP server. For this example I will use k4GeIIewQrA3. |
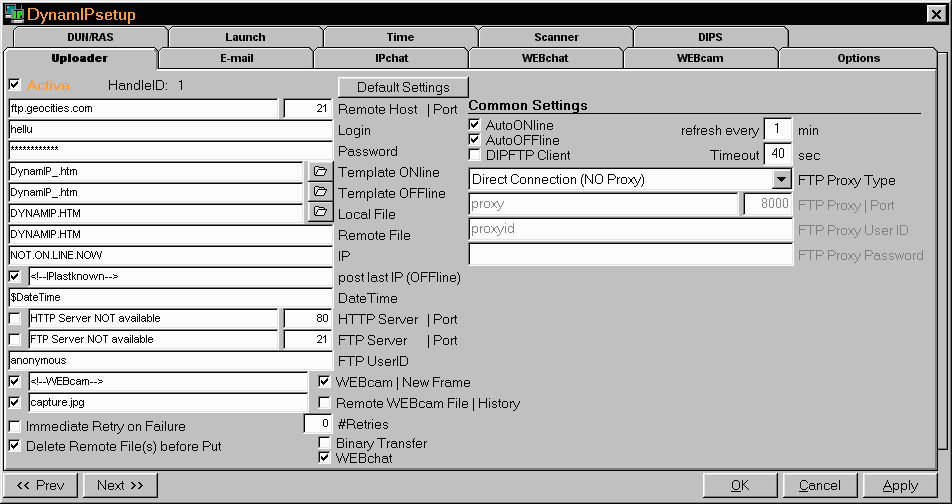
- Choose the menu Setup|WEBcam and verify that the
settings are as follows:

- Select the tab Uploader and enter the following
information:

Note that the filename in Remote WEBcam File does not
necessarily have to be capture.jpg as DynamIP
will automatically update the tag <!--WEBcam-->
in the template with an image tag that points to the appropriate remote JPEG file (just
make sure that you upload the JPEG file to the same directory as the Remote
File!!!). It is important that you check the check box just to the left of the Remote WEBcam File so that DynamIP
really uploads the file using FTP.
- Click the OK button, go online, and give it a try.
The above setup will update the WEBcam picture in 1
minute intervals and then upload the picture together with the updated template.
The DynamIP Uploader can do many more tricks. Check out the detailed setup instructions for the Uploader.
Last modified: April 05, 1999
OFFLINEvisitors since May 1, 1998
| 